Javascript HTML DOM
Updated:
HTML DOM
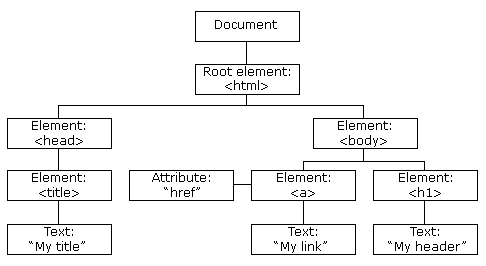
HTML DOM(Document Object Model)은 웹페이지를 구성하고 있는 모든 요소들을 일종의 객체로 만들어서 자바스크립트가 제어할 수 있도록 한 것이다. 웹 페이지가 전부 로드 되면 브라우저는 페이지의 DOM을 구성한다. HTML DOM 모델은 객체들의 트리 구조로 만들어진다.

HTML DOM은 자바스크립트(혹은 다른 언어)가 프로그래밍적으로 접근하고 변환하기위한 프로그래밍 인터페이스라고 할 수 있다. 자바스크립트는 웹브라우저 위에서 실행되긴 하지만 엄밀히 말하면 자바스크립트는 언어이고 웹브라우저는 언어가 제어하는 대상이라고 생각할 수 있다. 자바스크립트는 웹브라우저에서만 실행되는게 아니라 플래시 플레이어에서도 액션스크립트의 형태로 쓰인다. Node.js라는 언어 역시도 자바스크립트의 문법을 채용하고 있는데 자바스크립트와 달리 서버쪽의 자원을 핸들링할 때 쓰인다. 즉, 돔은 자바스크립트가 웹페이지를 핸들링하기 위한 프로그래밍 인터페이스다. 자바스크립트는 돔을 제어하는 방식으로 웹페이지를 제어한다.
도큐먼트 오브젝트 모델을 통해서 자바스크립트가 할 수 있는 일들은 다음과 같다.
- 자바스크립트는 페이지 내의 모든 HTML 요소들을 바꿀 수 있다.
- 자바스크립트는 페이지 내의 모든 HTML 속성들을 바꿀 수 있다.
- 자바스크립트는 페이지 내의 모든 CSS 스타일들을 바꿀 수 있다.
- 자바스크립트는 페이지 내의 모든 존재하는 HTML 요소들과 속성들을 지울 수 있다.
- 자바스크립트는 새로운 HTML 요소들과 속성들을 만들 수 있다.
- 자바스크립트는 페이지 내에서 일어나는 모든 HTML 이벤트들에 대해 반응할 수 있다.
- 자바스크립트는 페이지 내에서 새로운 HTML 이벤트를 만들 수 있다.
요약하자면, HTML DOM은 어떻게 HTML 요소들을 참조하고, 바꾸고, 추가하고, 삭제하는지에 대한 기준이다.
Method & Property
- HTML DOM Method : HTML 요소에 자바스크립트가 하는 액션
- HTML DOM Property : 자바스크립트를 통해 설정하거나 바꿀 수 있는 HTML 요소의 값
<!DOCTYPE html>
<html>
<body>

<h2>My First Page</h2>

<p id="demo"></p>

<script>
document.getElementById("demo").innerHTML = "Hello World!";
</script>

</body>
</html>
이 경우 getElementById는 method이고, innerHTML is a property이다.
DOM Document
HTML DOM Document는 웹 페이지 내의 모든 오브젝트들을 소유하고 있는 오브젝트이다. 웹 페이지 내의 어떤 HTML 요소에 접근하든 항상 document 오브젝트에 먼저 접근해야 한다. Document 오브젝트를 이용해 HTML을 조작하는 대표적인 예시들은 아래와 같다.
Finding HTML Elements
| Method | Description |
|---|---|
| document.getElementById(id) | Find an element by element id |
| document.getElementsByTagName(name) | Find elements by tag name |
| document.getElementsByClassName(name) | Find elements by class name |
Changing HTML Elements
| Property | Description |
|---|---|
| element.innerHTML = new html content | Change the inner HTML of an element |
| element.attribute = new value | Change the attribute value of an HTML element |
| element.style.property = new style | Change the style of an HTML element |
| Method | Description |
|---|---|
| element.setAttribute(attribute, value) | Change the attribute value of an HTML element |
Adding and Deleting Elements
| Method | Description |
|---|---|
| document.createElement(element) | Create an HTML element |
| document.removeChild(element) | Remove an HTML element |
| document.appendChild(element) | Add an HTML element |
| document.replaceChild(new, old) | Replace an HTML element |
| document.write(text) | Write into the HTML output stream |
Adding Events Handlers
| Method | Description |
|---|---|
| document.getElementById(id).onclick = function(){code} | Adding event handler code to an onclick event |
Finding HTML Objects
The first HTML DOM Level 1 (1998), defined 11 HTML objects, object collections, and properties. These are still valid in HTML5.
Later, in HTML DOM Level 3, more objects, collections, and properties were added.
| Property | Description | DOM |
|---|---|---|
| document.anchors | Returns all <a> elements that have a name attribute |
1 |
| document.applets | Returns all <applet> elements (Deprecated in HTML5) |
1 |
| document.baseURI | Returns the absolute base URI of the document | 3 |
| document.body | Returns the <body> element |
1 |
| document.cookie | Returns the document’s cookie | 1 |
| document.doctype | Returns the document’s doctype | 3 |
| document.documentElement | Returns the <html> element |
3 |
| document.documentMode | Returns the mode used by the browser | 3 |
| document.documentURI | Returns the URI of the document | 3 |
| document.domain | Returns the domain name of the document server | 1 |
| document.domConfig | Obsolete. Returns the DOM configuration | 3 |
| document.embeds | Returns all <embed> elements |
3 |
| document.forms | Returns all <form> elements |
1 |
| document.head | Returns the <head> element |
3 |
| document.images | Returns all <img> elements |
1 |
| document.implementation | Returns the DOM implementation | 3 |
| document.inputEncoding | Returns the document’s encoding (character set) | 3 |
| document.lastModified | Returns the date and time the document was updated | 3 |
| document.links | Returns all <area> and <a> elements that have a href attribute |
1 |
| document.readyState | Returns the (loading) status of the document | 3 |
| document.referrer | Returns the URI of the referrer (the linking document) | 1 |
| document.scripts | Returns all <script> elements |
3 |
| document.strictErrorChecking | Returns if error checking is enforced | 3 |
| document.title | Returns the <title> element |
1 |
| document.URL | Returns the complete URL of the document | 1 |
DOM HTML
자바스크립트로 HTML content 만들기
자바스크립트에서 document.write() 함수를 사용해 곧바로 HTML output을 만들 수 있다.
<!DOCTYPE html>
<html>
<body>

<script>
document.write(Date());
</script>

</body>
</html>
자바스크립트로 HTML content 변경하기
document.getElementById(id).innerHTML = new HTML
innerHTML 속성을 이용해 HTML 내용을 바꿀 수 있다.
<!DOCTYPE html>
<html>
<body>

<h2>JavaScript can Change HTML</h2>
<p id="p1">Hello World!</p>

<script>
document.getElementById("p1").innerHTML = "New text!";
</script>
<!--
var element = document.getElementById("p1");
element.innerHTML = "New text!";
이런식으로 변수로도 할당 가능하다
-->

<p>The paragraph above was changed by a script.</p>

</body>
</html>
자바스크립트로 HTML 속성 값 변경하기
document.getElementById(id).attribute = new value
<!DOCTYPE html>
<html>
<body>

<img id="image" src="smiley.gif" width="160" height="120">

<script>
document.getElementById("image").src = "landscape.jpg";
</script>

<p>The original image was smiley.gif, but the script changed it to landscape.jpg</p>

</body>
</html>
DOM CSS
자바스크립트로 HTML 요소의 스타일을 변경하기
document.getElementById(id).style.property = new style
<!DOCTYPE html>
<html>
<body>

<p id="p1">Hello World!</p>
<p id="p2">Hello World!</p>

<script>
document.getElementById("p2").style.color = "blue";
document.getElementById("p2").style.fontFamily = "Arial";
document.getElementById("p2").style.fontSize = "larger";
</script>

<p>The paragraph above was changed by a script.</p>

</body>
</html>
Event가 발생했을 때 스타일 변경하기
<!DOCTYPE html>
<html>
<body>

<h1 id="id1">My Heading 1</h1>

<button type="button"
onclick="document.getElementById('id1').style.color = 'red'">
Click Me!</button>

</body>
</html>
DOM Animation
자바스크립트로 HTML요소로 Animation 만들기
<!DOCTYPE html>
<html>
<style>
#container {
  width: 400px;
  height: 400px;
  position: relative;  /* 컨테이너는 relative로 설정 */
  background: yellow;
}
#animate {
  width: 50px;
  height: 50px;
  position: absolute;   /* 컨테이너 안에서 움직이게 될 animate 요소는 absolute로 설정 */
  background-color: red;
}
</style>
<body>

<p><button onclick="myMove()">Click Me</button></p>

<div id ="container">
  <div id ="animate"></div>
</div>

<script>
function myMove() {
  var elem = document.getElementById("animate");
  var pos = 0;
  var id = setInterval(frame, 5); // 5초동안 frame 함수 실행
  function frame() {
    if (pos == 350) {
      clearInterval(id);   // pos변수가 350이되면 종료 (animate 요소가 크기가 가로 세로 50이고 컨테이너가 가로 세로 400이기 때문에)
    } else {
      pos++;
      elem.style.top = pos + "px";
      elem.style.left = pos + "px";
    } // pos변수가 350이 되지 않을때까지 왼쪽과 윗쪽으로부터 1px씩 증가 (좌상단에서 우하단으로 이동하는 효과)
  }
}
</script>

</body>
</html>
자바스크립트로 myMove() 함수를 만들어서 HTML 요소를 이동시키는 코드이다. 이 코드를 조금 수정하여 좌상단에서 우하단으로 이동하는게 아닌 먼저 좌에서 우로, 그리고 위에서 아래로 ‘ㄱ’자 형태로 이동하도록 코드를 변경해 보았다.
<!DOCTYPE html>
<html>
<style>
#container {
  width: 400px;
  height: 400px;
  position: relative;
  background: yellow;
}
#animate {
  width: 50px;
  height: 50px;
  position: absolute;
  background-color: red;
}
</style>
<body>

<p><button onclick="myMove()">Click Me</button></p>

<div id ="container">
  <div id ="animate"></div>
</div>

<script>
function myMove() {
  var elem = document.getElementById("animate");
  var pos =0;
  var posLeft = 0;
  var posTop = 0;
  var id = setInterval(frame, 5);
  function frame() {
    if (pos <= 350) {
      pos++;
      posLeft++;
      elem.style.left = posLeft + "px";
    } else if(pos>350 && pos <= 700){
      pos++;
      posTop++;
      elem.style.top = posTop + "px";
    } else {
    	clearInterval(id);
    }
  }
}
</script>

</body>
</html>
기존에 pos 변수가 top과 left에 동시에 적용되었다면 이 코드는 pos 변수를 카운터 역할로 놓고 left를 증가시키는 posLeft변수와 top을 증가시키는 posTop 변수를 추가로 선언하여 개별로 카운트해주었다. 즉, 0~350까지는 left만 한 픽셀씩 추가시켜주고 351~700까지는 top만 한 픽셀씩 추가해주었다. 그 결과 animate 요소가 대각선으로 이동하는게 아닌 ‘ㄱ’자로 움직이게 되었다.
DOM Events
자바스크립트로 이벤트 다루기
onclick=JavaScript
HTML DOM은 자바스크립트가 HTML 이벤트에 반응할 수 있도록 해준다.
<!DOCTYPE html>
<html>
<body>

<div onmousedown="mDown(this)" onmouseup="mUp(this)"
style="background-color:#D94A38;width:90px;height:20px;padding:40px;">
Click Me</div>

<script>
function mDown(obj) {
  obj.style.backgroundColor = "#1ec5e5";
  obj.innerHTML = "Release Me";
}

function mUp(obj) {
  obj.style.backgroundColor="#D94A38";
  obj.innerHTML="Thank You";
}
</script>

</body>
</html>
DOM EventListner
HTML요소에서 이벤트가 발생시 자바스크립트 코드를 호출하는것도 가능하지만 처음부터 자바스크립트 코드에서 이벤트를 탐지하는것도 가능하다. addEventListener(“이벤트”, “이벤트 리스너, “(옵션 파라미터-이벤트 버블링 or 이벤트 캡쳐링)”) 함수를 통해 가능한데 이 방식은 HTML 코드와 자바스크립트 코드를 완전히 분리하여 가독성이나 유지보수성이 더 좋아지는 효과가 있다. addEventListener의 첫번째 파라미터는 말 그대로 이벤트(click, mousedown, mouseup.. 등)를 의미하고 이벤트 핸들러는 사용자가 그 이벤트에 대해 처리하고 싶은 액션을 정의한 함수를 의미하고 세번째 파라미터는 옵션이라 있어도 되고 없어도 된다. 세번째 파라미터는 조금 복잡한데 간단히 설명하면 이벤트가 발생한 여러 요소들이 있을 때 그 요소들에 대한 이벤트 전파 방식을 어떤 순서로 진행할것인지에 대한 파라미터이다. 이벤트 버블링은 여러 요소에서 이벤트가 발생했을 때 하위요소에서 상위요소로 전파되어가는 것을 의미하고 이벤트 캡쳐링은 반대의 개념이다. 파라미터의 타입은 boolean이고 디폴트는 false(이벤트 버블링)인데 이벤트 캡쳐링을 해주고 싶으면 “true”를 추가해주면 된다. 더 자세한 개념은 여기(참고 출저)에서 확인할 수 있다.
document.getElementById(“myBtn”).addEventListener(“click”, displayDate);
<!DOCTYPE html>
<html>
<body>

<h2>JavaScript addEventListener()</h2>

<p>This example uses the addEventListener() method to attach a click event to a button.</p>

<button id="myBtn">Try it</button>

<p id="demo"></p>

<script>
document.getElementById("myBtn").addEventListener("click", displayDate);

function displayDate() {
  document.getElementById("demo").innerHTML = Date();
}
</script>

</body>
</html>
한 요소에 여러 이벤트 리스너 동시에 적용하기
<!DOCTYPE html>
<html>
<body>

<h2>JavaScript addEventListener()</h2>

<p>This example uses the addEventListener() method to add two click events to the same button.</p>

<button id="myBtn">Try it</button>

<script>
var x = document.getElementById("myBtn");
x.addEventListener("click", myFunction);
x.addEventListener("click", someOtherFunction);

function myFunction() {
  alert ("Hello World!");
}

function someOtherFunction() {
  alert ("This function was also executed!");
}
</script>

</body>
</html>
한 요소에 여러 타입의 이벤트 리스너 적용하기
<!DOCTYPE html>
<html>
<body>

<h2>JavaScript addEventListener()</h2>

<p>This example uses the addEventListener() method to add many events on the same button.</p>

<button id="myBtn">Try it</button>

<p id="demo"></p>

<script>
var x = document.getElementById("myBtn");
x.addEventListener("mouseover", myFunction);
x.addEventListener("click", mySecondFunction);
x.addEventListener("mouseout", myThirdFunction);

function myFunction() {
  document.getElementById("demo").innerHTML += "Moused over!<br>";
}

function mySecondFunction() {
  document.getElementById("demo").innerHTML += "Clicked!<br>";
}

function myThirdFunction() {
  document.getElementById("demo").innerHTML += "Moused out!<br>";
}
</script>

</body>
</html>
이벤트 리스너 없애기
<!DOCTYPE html>
<html>
<head>
<style>
#myDIV {
  background-color: coral;
  border: 1px solid;
  padding: 50px;
  color: white;
  font-size: 20px;
}
</style>
</head>
<body>

<h2>JavaScript removeEventListener()</h2>

<div id="myDIV">
  <p>This div element has an onmousemove event handler that displays a random number every time you move your mouse inside this orange field.</p>
  <p>Click the button to remove the div's event handler.</p>
  <button onclick="removeHandler()" id="myBtn">Remove</button>
</div>

<p id="demo"></p>

<script>
document.getElementById("myDIV").addEventListener("mousemove", myFunction);

function myFunction() {
  document.getElementById("demo").innerHTML = Math.random();
}

function removeHandler() {
  document.getElementById("myDIV").removeEventListener("mousemove", myFunction);
}
</script>

</body>
</html>
DOM Navigation
HTML Document의 모든 것들은 Node이다. Document 자체도 노드이고 그 안의 요소들과 요소 안의 텍스트들과 심지어 주석 조차도 노드이다.
노드 관계
노드들은 트리구조를 갖게 되는데 부모-자식관계와 형제관계로 표현될 수 있다. 다음 코드를 보자.
<html>

  <head>
    <title>DOM Tutorial</title>
  </head>

  <body>
    <h1>DOM Lesson one</h1>
    <p>Hello world!</p>
  </body>

</html>
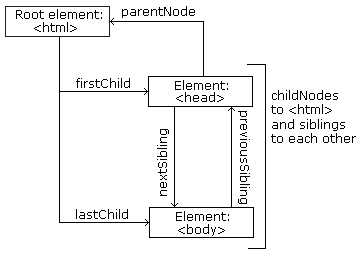
head와 body까지만 보면 이런 그림으로 관계를 나타낼 수 있다.

- 그림을 알 수 있는 사실들은
<html>은 루트 노드이다.<html>은 부모 노드가 없다.<html>은<head>와<body>의 부모 노드이다.<head>는<html>의 첫번째 자식 노드이다.<body>는<html>의 두번째 자식 노드이다.
- 위의 코드를 더 자세히 들어가서 보면
<head>는<title>라는 하나의 자식을 가지고 있다.<title>“DOM Tutorial”이라는 하나의 텍스트 노드 자식을 가지고 있다.<body>는<h1>과<p>, 두개의 자식 노드를 가지고 있다.<h1>는 “DOM Lesson one” 이라는 하나의 자식 노드를 가지고 있다.<p>는 “Hello world!” 라는 하나의 자식 노드를 가지고 있다.<h1>과<p>는 형제 노드 관계이다.
노드 사이 이동하기
다음과 같은 노드 속성들로 노드 사이를 이동할 수 있다.
parentNodechildNodes[*nodenumber*]firstChildlastChildnextSiblingpreviousSibling
DOM Nodes
HTML DOM에 새로운 노드를 추가하기 위해서는 먼저 요소를 만들고 그 요소에 노드를 추가해주어야 한다.
<!DOCTYPE html>
<html>
<body>

<div id="div1">
<p id="p1">This is a paragraph.</p>
<p id="p2">This is another paragraph.</p>
</div>

<script>
var para = document.createElement("p");
var node = document.createTextNode("This is new.");
para.appendChild(node);
var element = document.getElementById("div1");
element.appendChild(para);
</script>

</body>
</html>
-
appendChild()의 경우 새 요소를 부모의 가장 마지막 자식 다음에 넣게 되는데 만약 특정 자식 이전에 넣고 싶다면insertBefore()함수를 쓰면 된다. 링크 -
만약 특정 요소를 지우고 싶다면
remove()함수를 쓰면 된다. 링크 -
remove()함수를 지원하지 않는 브라우저는 먼저 부모 노드를 찾고 자식 노드를 지워줘야 한다. 링크 -
HTML 요소 를 다른 요소로 대체하고 싶을 땐
replaceChild()함수를 쓰면 된다. 링크
DOM Collections & DOM Node Lists
HTMLCollection
getElementsByTagName()같은 함수는HTMLCollection오브젝트를 리턴한다.HTMLCollection오브젝트는 배열처럼 HTML 요소들을 담고 있다.
NodeList
querySelectorAll()같은 함수는 NodeList 오브젝트를 리턴한다.HTMLCollection과 비슷하지만 다른 점은NodeList는 document 노드들을 담고 있다.
공통점
- 둘 다 오브젝트들을 담고있는 배열 형태의 오브젝트이다.
- 둘 다 현재 아이템들의 개수를 알려주는 length 속성을 가지고 있다.
- 둘 다 배열처럼 각 아이템에 인덱스(0, 1, 2, 3, 4, …)로 접근할 수 있다.
차이점
HTMLCollection은 name, id, index 로 아이템에 접근 가능하지만NodeList는 인덱스로만 접근이 가능하다.NodeList만 속성(attribute)노드와 텍스트 노드를 포함할 수 있다.


Leave a comment