jQuery 정리 2
Updated:
jQuery Traversing
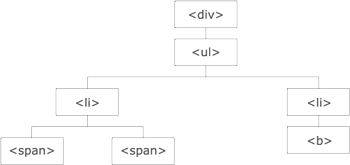
jQuery도 자바스크립트와 마찬가지로 HTML DOM을 이용해 요소들을 찾고 선택해서 원하는 작업을 할 수 있다. jQuery는 DOM 트리 구조를 이용하여 현재 요소로부터의 ancestor와 descendants와 sibling사이를 자유롭게 움직일 수 있다.

위의 그림 설명
- The
<div>element is the parent of<ul>, and an ancestor of everything inside of it - The
<ul>element is the parent of both<li>elements, and a child of<div> - The left
<li>element is the parent of<span>, child of<ul>and a descendant of<div> - The
<span>element is a child of the left<li>and a descendant of<ul>and<div> - The two
<li>elements are siblings (they share the same parent) - The right
<li>element is the parent of<b>, child of<ul>and a descendant of<div> - The
<b>element is a child of the right<li>and a descendant of<ul>and<div>
Ancestors
parent(): 선택된 요소의 한개의 조상(바로 위)만 선택parents(): 선택된 요소의 모든 조상 선택parentsUntil(): 선택된 요소와 지정된 요소 사이에 존재하는 조상만 선택
<!DOCTYPE html>
<html>
<head>
<style>
.ancestors * {
  display: block;
  border: 2px solid lightgrey;
  color: lightgrey;
  padding: 5px;
  margin: 15px;
}
</style>
<script src="https://ajax.googleapis.com/ajax/libs/jquery/3.5.1/jquery.min.js"></script>
<script>
$(document).ready(function(){
  $("span").parentsUntil("div").css({"color": "red", "border": "2px solid red"});
});
</script>
</head>

<body class="ancestors"> body (great-great-grandparent)
  <div style="width:500px;">div (great-grandparent)
    <ul>ul (grandparent)
      <li>li (direct parent)
        <span>span</span>
      </li>
    </ul>
  </div>
</body>

</html>
Descendants
children(): 선택된 요소의 한개의 후손(바로 아래)만 선택find(): 선택된 요소의 후손 중 특정 요소를 찾는다
<!DOCTYPE html>
<html>
<head>
<style>
.descendants * {
  display: block;
  border: 2px solid lightgrey;
  color: lightgrey;
  padding: 5px;
  margin: 15px;
}
</style>
<script src="https://ajax.googleapis.com/ajax/libs/jquery/3.5.1/jquery.min.js"></script>
<script>
$(document).ready(function(){
  $("div").find("span").css({"color": "red", "border": "2px solid red"});
});
</script>
</head>
<body>

<div class="descendants" style="width:500px;">div (current element)
  <p>p (child)
    <span>span (grandchild)</span>
  </p>
  <p>p (child)
    <span>span (grandchild)</span>
  </p>
</div>

</body>
</html>
Siblings
siblings(): 모든 형제 요소들 선택next(): 선택된 요소의 바로 다음 요소 선택nextAll(): 선택된 요소의 모든 다음 요소 선택nextUntil(): 선택된 요소와 지정된 요소 사이에 존재하는 모든 형제 요소들 선택prev():next()와 정 반대 개념prevAll():nextAll()과 정 반대 개념prevUntil():nextUntil()과 정 반대 개념
<!DOCTYPE html>
<html>
<head>
<style>
.siblings * {
  display: block;
  border: 2px solid lightgrey;
  color: lightgrey;
  padding: 5px;
  margin: 15px;
}
</style>
<script src="https://ajax.googleapis.com/ajax/libs/jquery/3.5.1/jquery.min.js"></script>
<script>
$(document).ready(function(){
  $("h2").nextUntil("h6").css({"color": "red", "border": "2px solid red"});
});
</script>
</head>
<body class="siblings">

<div>div (parent)
  <p>p</p>
  <span>span</span>
  <h2>h2</h2>
  <h3>h3</h3>
  <h4>h4</h4>
  <h5>h5</h5>
  <h6>h6</h6>
  <p>p</p>
</div>

</body>
</html>
Filtering
first(): 선택된 요소 중 첫번째 요소last(): 선택된 요소 중 마지막 요소eq(): 선택된 요소중 특정 인덱스에 해당하는 요소filter(): 선택된 요소 중 특정 기준에 해당하는 요소not(): 선택된 요소 중 특정 기준에 해당하지 않는 요소
<!DOCTYPE html>
<html>
<head>
<script src="https://ajax.googleapis.com/ajax/libs/jquery/3.5.1/jquery.min.js"></script>
<script>
$(document).ready(function(){
  $("p").filter(".intro").css("background-color", "yellow");
});
</script>
</head>
<body>

<h1>Welcome to My Homepage</h1>

<p>My name is Donald.</p>
<p class="intro">I live in Duckburg.</p>
<p class="intro">I love Duckburg.</p>
<p>My best friend is Mickey.</p>

</body>
</html>
jQuery AJAX
AJAX는 자바스크립트를 이용해 비동기식으로 서버와 데이터를 주고 받으면서 웹 페이지를 새로고침하지 않은 상태에서 웹 페이지의 특정 부분을 업데이트하는 기술을 의미한다. jQuery의 AJAX 함수를 이용해 text, HTML, XML, JSON 데이터들을 서버로부터 HTTP Get방식과 HTTP Post방식으로 받아올 수 있고 동시에 그렇게 받아온 데이터들을 선택된 HTML 요소들에 넣을 수 있다.
AJAX를 적용한 웹 페이지들의 예시 : Gmail, Google Maps, Youtube, and Facebook tabs.. etc
jQuery Load
jQuery가 제공하는 load()함수는 단순하고 강력한 AJAX 함수이다. load()함수는 서버로부터 받아온 데이터를 선택된 HTML 요소에 넣을 수 있다.
$(selector).load(URL,data,callback);
URL은 요청하고자 하는 서버의 주소이고, data는 요청을 보낼때 ‘key : value’ 형태로 보낼 수 있고, callback함수는 load()함수가 성공적으로 종료된 이후에 실행될 함수이다. data와 callback 인자의 경우 필수인자가 아닌 옵션인자이다.
callback 함수의 경우 3가지 인자를 가지고 있다.
responseTxt: 데이터를 성공적으로 가져왔다면 데이터를 담고있는 인자이다.statusTxt: 함수를 호출하고 나서의 상태를 나타내는 인자이다(success 인지 error인지..)xhr:XMLHTTPRequest객체를 담고 있다.
<!DOCTYPE html>
<html>
<head>
<script src="https://ajax.googleapis.com/ajax/libs/jquery/3.5.1/jquery.min.js"></script>
<script>
$(document).ready(function(){
  $("button").click(function(){
    $("#div1").load("demo_test.txt", function(responseTxt, statusTxt, xhr){
      if(statusTxt == "success")
        alert("External content loaded successfully!");
      if(statusTxt == "error")
        alert("Error: " + xhr.status + ": " + xhr.statusText);
    });
  });
});
</script>
</head>
<body>

<div id="div1"><h2>Let jQuery AJAX Change This Text</h2></div>

<button>Get External Content</button>

</body>
</html>
Ajax get() & post()
jQuery의 get() 함수와 post()함수는 GET방식이나 POST방식으로 서버에게 데이터를 요청할 때 사용된다. 보통 jQuery로 AJAX를 구현할 때는 load()함수보다 이 두가지를 더 자주 사용한다. GET 방식은 URL을 통해 데이터를 보내는 반면에 POST방식은 데이터가 암호화되어서 사용자가 볼 수 없게 데이터를 보내게 된다.
$get() 함수
$.get(URL,callback);
URL은 요청하고자 하는 서버의 주소이고, callback함수는 get()함수가 성공적으로 종료된 이후에 실행될 함수이다. callback 인자의 경우 필수인자가 아닌 옵션인자이다.
<!DOCTYPE html>
<html>
<head>
<script src="https://ajax.googleapis.com/ajax/libs/jquery/3.5.1/jquery.min.js"></script>
<script>
$(document).ready(function(){
  $("button").click(function(){
    $.get("demo_test.asp", function(data, status){  // data : 데이터를 담고 있는 인자 / status : 요청 이후 현재의 상태
      alert("Data: " + data + "\nStatus: " + status);
    });
  });
});
</script>
</head>
<body>

<button>Send an HTTP GET request to a page and get the result back</button>

</body>
</html>
$post() 함수
$.post(URL,data,callback);
URL은 요청하고자 하는 서버의 주소이고, data는 요청을 보낼때 ‘key : value’ 형태로 보낼 수 있고, callback함수는 post()함수가 성공적으로 종료된 이후에 실행될 함수이다. data와 callback 인자의 경우 필수인자가 아닌 옵션인자이다.
<!DOCTYPE html>
<html>
<head>
<script src="https://ajax.googleapis.com/ajax/libs/jquery/3.5.1/jquery.min.js"></script>
<script>
$(document).ready(function(){
  $("button").click(function(){
    $.post("demo_test_post.asp",
    {
      name: "Donald Duck",
      city: "Duckburg"
    },
    function(data,status){
      alert("Data: " + data + "\nStatus: " + status);
    });
  });
});
</script>
</head>
<body>

<button>Send an HTTP POST request to a page and get the result back</button>

</body>
</html>
jQuery noConflict()
만약에 jQuery를 사용하는 페이지에 다른 프레임워크들(Angular, Backbone, Ember, Knockout 등)을 사용하는 경우에 jQuery의 ‘$’문자가 다른 프레임워크의 ‘$’문자와 충돌해서 에러가 난다면 어떻게 해야 할까? 실제로 그런 경우가 존재할 수 있기 때문에 jQuery는 그러한 에러를 방지하기 위해 noConflict()함수를 제공한다. noConflict()함수는 ‘$’문자에 대한 소유권을 잠시 포기하여 다른 script들이 그 문자를 사용할 수 있도록 해준다.
자바스크립트 에러의 경우 대부분의 에러(브라우저 콘솔 창에서 확인 가능)들은 아무 문제 없이 지나가지만 몇몇 에러는 크리티컬한 경우에 에러가 난 지점부터 아래의 모든 코드가 실행이 안되는 경우도 있다.
방법 1
$.noConflict();  // '$'소유권 잠시 포기
jQuery(document).ready(function(){                  // '$'대신에 'jQuery' 키워드 사용
  jQuery("button").click(function(){                // '$'대신에 'jQuery' 키워드 사용
    jQuery("p").text("jQuery is still working!");   // '$'대신에 'jQuery' 키워드 사용
  });
});
방법 2
var jq = $.noConflict();   // noConflict()함수는 jQuery 레퍼런스를 반환하기 때문에 변수에 저장할 수 있다.
jq(document).ready(function(){                // 한 자라도 덜 쓰기 위해 변수로 사용
  jq("button").click(function(){              // 한 자라도 덜 쓰기 위해 변수로 사용
    jq("p").text("jQuery is still working!"); // 한 자라도 덜 쓰기 위해 변수로 사용
  });
});
방법 3
$.noConflict();
jQuery(document).ready(function($){
  $("button").click(function(){
    $("p").text("jQuery is still working!");
  }); // ready()함수에 인자로 '$'를 넘기면 이 함수 안에선 '$'문자를 사용할 수 있다. (함수 밖에선 여전히'jQuery'  사용해야 한다.)
}); // block 안에 너무 많은 코드가 있는 경우 전부 수정하기 힘들기 때문에 이 방법을 사용하면 좋다.


Leave a comment