
HTML 정리 2
Updated:
HTML의 정의
- HTML은 ‘Hyper Text Markup Language’의 약자이다
- HTML은 웹 페이지를 만들기 위한 Markup Language이다
- HTML은 웹 페이지의 구조를 표현한다
- HTML은 여러 요소(element)들로 구성되어 있다
- HTML의 여러 요소들은 브라우저에게 콘텐츠를 어떻게 보여줄 지 결정한다
HTML의 구조
<!DOCTYPE html>
<html>
<head>
<title>Page Title</title>
</head>
<body>

<h1>This is a Heading</h1>
<p>This is a paragraph.</p>

</body>
</html>
<!DOCTYPE html>선언문은 이 문서가 HTML5 문서라는 것을 보여준다<html>요소는 HTML 페이지의 root 요소이다<head>요소는 해당 HTML 페이지의 메타 정보를 담고 있다<title>요소는 해당 HTML 페이지의 제목을 정의한다(브라우저의 페이지 탭에 표시 된다)<body>요소는 문서에서 보여지는 모든 요소들(headings, paragraphs, images, hyperlinks, tables, lists, etc)을 담는 컨테이너 역할을 한다<h1>요소는 큰 heading을 의미한다<p>요소는 paragraph를 의미한다
HTML 소스 코드
브라우저에서 우클릭 후 ‘페이지 소스 보기’를 누르면 해당 페이지의 html 소스코드를 확인할 수 있다
Heading
<h1>This is heading 1</h1>
<h2>This is heading 2</h2>
<h3>This is heading 3</h3>
<h4>This is heading 4</h4>
<h5>This is heading 5</h5>
<h6>This is heading 6</h6>
- h1 부터 h6는 사이즈별로 가장 큰 헤딩부터 가장 작은 헤딩까지 나타낸다.
Paragraph
<p>This is a paragraph.</p>
<p>This is another paragraph.</p>
-
태그는 paragraph를 나타낸다
Links
<h2>HTML Links</h2>
<p>HTML links are defined with the a tag:</p>

<a href="https://www.w3schools.com">This is a link</a>
- a 태그의 href 속성으로 주소를 지정하고 태그 안에는 표시될 내용을 입력한다
Images
<h2>HTML Images</h2>
<p>HTML images are defined with the img tag:</p>

<img src="w3schools.jpg" alt="W3Schools.com" width="104" height="142">
- 이미지 태그는 img 태그 내에 src 속성으로 이미지를 지정하고 alt 속성으로 대체 택스트(이미지가 보이지 않을 경우)를 지정하고 width와 height로 이미지의 크기를 지정한다
Style 속성
<p style="color:red;">This is a red paragraph.</p>
- Style 속성은 요소 안에서 스타일을 추가할 때 사용한다
Lang 속성
<!DOCTYPE html>
<html lang="en">
<!-- <html lang="en-US"> -->
<!-- 이런식으로 나라도 지정 가능 -->

<body>
...
</body>
</html>
- lang 속성은 웹 페이지의 언어를 선언할 때 사용한다
Text Formatting
<p><b>This text is bold</b></p>
<p><i>This text is italic</i></p>
<p>This is<sub> subscript</sub> and <sup>superscript</sup></p>
<b>- Bold text<strong>- Important text<i>- Italic text<em>- Emphasized text<mark>- Marked text<small>- Smaller text<del>- Deleted text<ins>- Inserted text<sub>- Subscript text<sup>- Superscript text
Quotations
<abbr>- Abbreviation<address>- Contact information for the author/owner of a document<bdo>-Text direction<blackquote>- Section that is quoted from another source<cite>- Title of a work<q>- Short inline quotation
HTML Comments
<!-- Write your comments here -->
- HTML에서 주석은 위의 방식으로 달 수 있다
HTML Colors - Text
<h1 style="color:Tomato;">Hello World</h1>
<p style="color:DodgerBlue;">Lorem ipsum...</p>
<p style="color:MediumSeaGreen;">Ut wisi enim...</p>
- 텍스트 색깔 지정하기
HTML Colors - Border
<h1 style="border:2px solid Tomato;">Hello World</h1>
<h1 style="border:2px solid DodgerBlue;">Hello World</h1>
<h1 style="border:2px solid Violet;">Hello World</h1>
- 요소의 경계선의 색깔을 지정하기
HTML Colors Values
<p>Same as color name "Tomato":</p>

<h1 style="background-color:rgb(255, 99, 71);">rgb(255, 99, 71)</h1>
<h1 style="background-color:#ff6347;">#ff6347</h1>
<h1 style="background-color:hsl(9, 100%, 64%);">hsl(9, 100%, 64%)</h1>

<p>Same as color name "Tomato", but 50% transparent:</p>
<h1 style="background-color:rgba(255, 99, 71, 0.5);">rgba(255, 99, 71, 0.5)</h1>
<h1 style="background-color:hsla(9, 100%, 64%, 0.5);">hsla(9, 100%, 64%, 0.5)</h1>

<p>In addition to the predefined color names, colors can be specified using RGB, HEX, HSL, or even transparent colors using RGBA or HSLA color values.</p>
- HTML에서는 여러가지 색깔 지정 방식을 제공한다
- 일반 색깔
- RGB values : rgb(255, 99, 71)
- HEX values : #ff6347
- HSL values : hsl(9, 100%, 64%)
- 투명도 추가한 색깔
- RGBA values : rgba(255, 99, 71, 0.5)
- HSLA values : hsla(9, 100%, 64%, 0.5)
- 일반 색깔
Inline CSS
<h1 style="color:blue;">A Blue Heading</h1>

<p style="color:red;">A red paragraph.</p>
- 요소 내에 style 속성으로 스타일을 지정하는 방식이다
- 한 요소에만 스타일을 지정할 때 사용된다
Internal CSS
<!DOCTYPE html>
<html>
<head>
<style>
body {background-color: powderblue;}
h1   {color: blue;}
p    {color: red;}
</style>
</head>
<body>

<h1>This is a heading</h1>
<p>This is a paragraph.</p>

</body>
</html>
- head태그 내에 style 태그 내에 정의 된다
- 한 페이지에만 스타일을 적용하고 싶을 때 사용된다
External CSS
<!DOCTYPE html>
<html>
<head>
  <link rel="stylesheet" href="styles.css">
</head>
<body>

<h1>This is a heading</h1>
<p>This is a paragraph.</p>

</body>
</html>
/* style.css */

body {
  background-color: powderblue;
}
h1 {
  color: blue;
}
p {
  color: red;
}
- 여러 페이지에 동일한 스타일을 적용하고 싶을 때 사용된다
Link to External CSS
<!DOCTYPE html>
<html>
<head>
  <link rel="stylesheet" href="https://www.w3schools.com/html/styles.css">
</head>
<body>

<h1>This is a heading</h1>
<p>This is a paragraph.</p>

</body>
</html>
- URL이나 현재 웹 페이지의 상대주소를 이용해 외부의 css 파일을 적용하고 싶을 때 사용된다
CSS Comments
/* Write your comments here */
- CSS에서 주석은 위의 방식으로 달 수 있다
CSS Colors, Fonts and Sizes
<!DOCTYPE html>
<html>
<head>
<style>
h1 {
  color: blue;
  font-family: verdana;
  font-size: 300%;

}
p  {
  color: red;
  font-family: courier;
  font-size: 160%;
}
</style>
</head>
<body>

<h1>This is a heading</h1>
<p>This is a paragraph.</p>

</body>
</html>
- CSS로 텍스트의 색깔과 폰트와 크기를 지정
CSS Border
<!DOCTYPE html>
<html>
<head>
<style>
p {
  border: 2px solid powderblue;
}
</style>
</head>
<body>

<h1>This is a heading</h1>

<p>This is a paragraph.</p>
<p>This is a paragraph.</p>
<p>This is a paragraph.</p>

</body>
</html>
- CSS로 Border의 스타일을 지정
CSS Padding
<!DOCTYPE html>
<html>
<head>
<style>
p {
  border: 2px solid powderblue;
  padding: 30px;
}
</style>
</head>
<body>

<h1>This is a heading</h1>

<p>This is a paragraph.</p>
<p>This is a paragraph.</p>
<p>This is a paragraph.</p>

</body>
</html>
- CSS로 Padding(Text와 Border 사이의 거리) 지정
CSS Margin
<!DOCTYPE html>
<html>
<head>
<style>
p {
  border: 2px solid powderblue;
  margin: 50px;
}
</style>
</head>
<body>

<h1>This is a heading</h1>

<p>This is a paragraph.</p>
<p>This is a paragraph.</p>
<p>This is a paragraph.</p>

</body>
</html>
- CSS로 Margin(Border 밖의 거리) 지정
HTML Tables
<table style="width:100%">
  <tr>
    <th>Firstname</th>
    <th>Lastname</th>
    <th>Age</th>
  </tr>
  <tr>
    <td>Jill</td>
    <td>Smith</td>
    <td>50</td>
  </tr>
  <tr>
    <td>Eve</td>
    <td>Jackson</td>
    <td>94</td>
  </tr>
  <tr>
    <td>John</td>
    <td>Doe</td>
    <td>80</td>
  </tr>
</table>
- Table, tr, th, td 태그들을 이용해 표를 만들 수 있다
Unordered HTML List
<h2>An unordered HTML list</h2>

<ul>
  <li>Coffee</li>
  <li>Tea</li>
  <li>Milk</li>
</ul>
- HTML 번호가 없는 목록
Ordered HTML List
<h2>An ordered HTML list</h2>

<ol>
  <li>Coffee</li>
  <li>Tea</li>
  <li>Milk</li>
</ol>
- HTML 번호가 있는 목록
HTML Description Lists
<h2>A Description List</h2>

<dl>
  <dt>Coffee</dt>
  <dd>- black hot drink</dd>
  <dt>Milk</dt>
  <dd>- white cold drink</dd>
</dl>
- HTML 설명 있는 목록
Block-level Elements
<div style="border: 1px solid black">Hello World</div>

<p>The DIV element is a block element, and will always start on a new line and take up the full width available (stretches out to the left and right as far as it can).</p>
- 블락 레벨 요소는 언제나 새로운 줄에서 시작하고, 좌우 양쪽으로 최대한 늘어나 가능한 모든 너비를 차지한다
- 마치 상자를 쌓듯이 브라우저는 보통 블록 레벨 요소의 앞과 뒤를 개행해서 그린다
- 대표적으로 div 요소가 있고 그 외에 아래와 같은 요소들이 있다
<address> <article> <aside> <blockquote> <canvas> <dd> <dl> <dt> <fieldset> <figcaption> <figure> <footer> <form> <h1>-<h6> <header> <hr> <li> <main> <nav> <noscript> <ol> <p> <pre> <section> <table> <tfoot> <ul> <video>
- 이 중에 div 요소는 HTML에서 다른 요소들을 담는 컨테이너 역할로 가장 많이 쓰인다
- div 요소는 필수 속성은 가지고 있지 않지만
style,classandid와 같이 자주 쓰인다 - div는 CSS와의 조합으로 특정 콘텐츠의 영역을 디자인 하는 용도로 자주 쓰인다
HTML iframes
<iframe src="url" title="description">
- 웹 페이지 내에 웹 페이지를 띄우는 용도로 사용된다
HTML JavaScript
<!DOCTYPE html>
<html>
<body>

<h1>My First JavaScript</h1>

<button type="button"
onclick="document.getElementById('demo').innerHTML = Date()">
Click me to display Date and Time.</button>

<p id="demo"></p>

</body>
</html>
- JavaScript는 HTML 페이지를 동적으로 만들어서 사용자와 반응할 수 있도록 해준다
The HTML ‘script’ Tag
<!DOCTYPE html>
<html>
<body>

<h2>Use JavaScript to Change Text</h2>
<p>This example writes "Hello JavaScript!" into an HTML element with id="demo":</p>

<p id="demo"></p>

<script>
document.getElementById("demo").innerHTML = "Hello JavaScript!";
</script>

</body>
</html>
- HTML의
<script>태그는 클라이언트단에서의 script(자바스크립트)를 작성할 때 사용된다 <script>태그는 내부에 스크립트를 작성하거나 src 속성을 통해 외부의 스크립트 파일을 가리킨다- 자바스크립트는 보통 이미지 동작, Form 입력 등 동적인 부분을 다루는데 사용된다
- 특정 HTML 요소를 선택할때 자바스크립트는 보통
document.getElementById()함수를 사용한다
HTML Layout Elements and Techniques
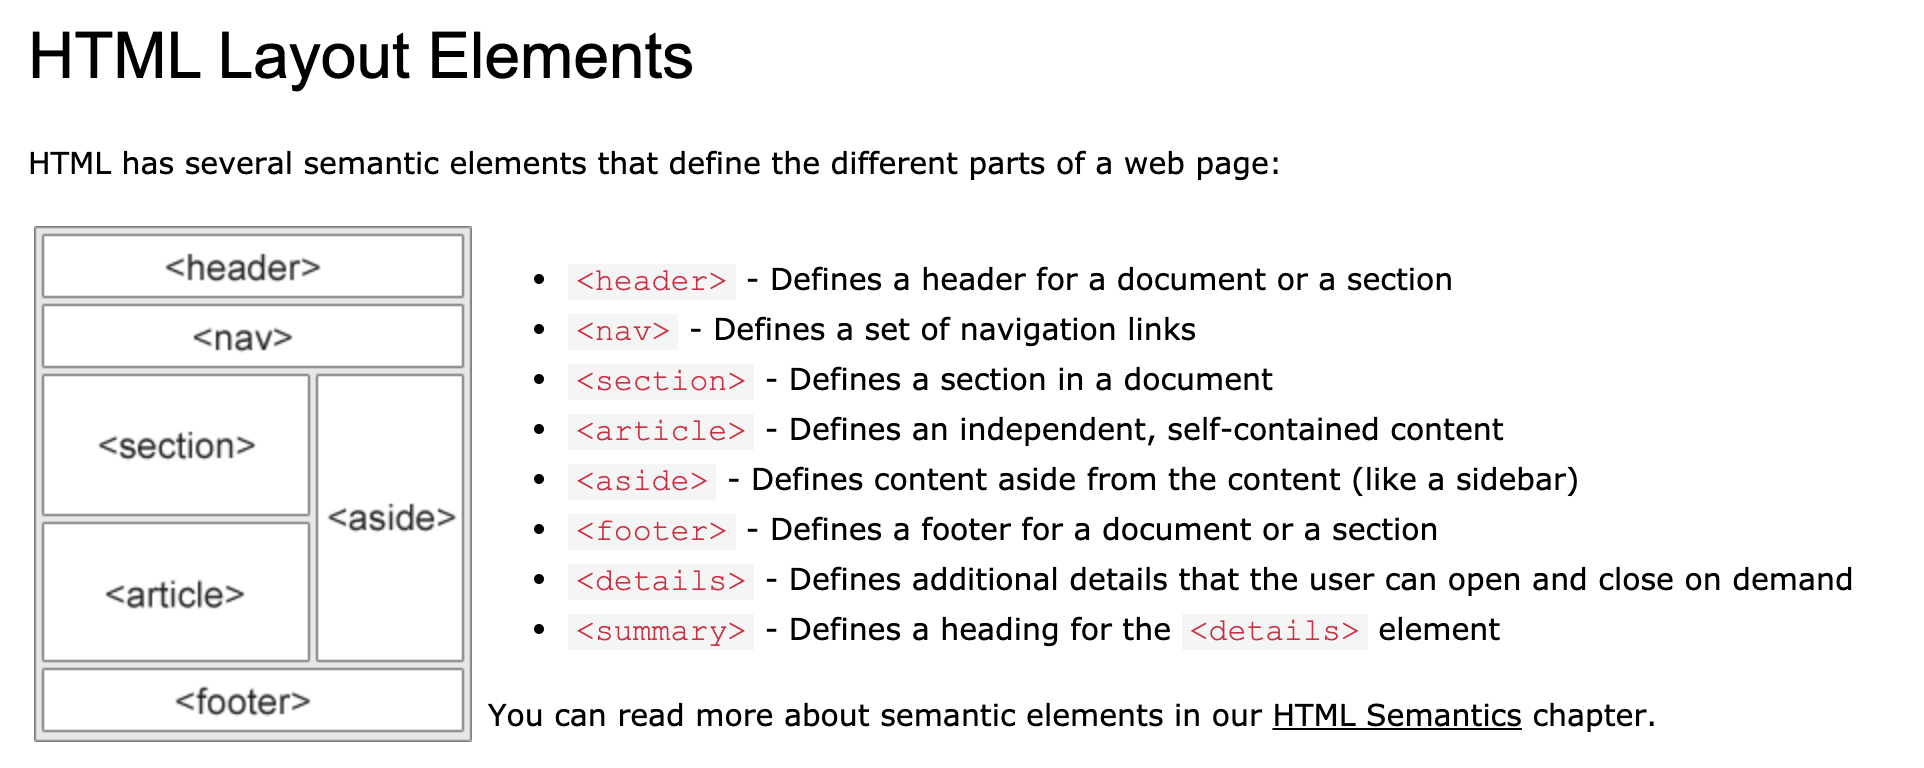
- 보통 웹 페이지를 만들 때 레이아웃을 갖추고 만들게 된다
- 레이아웃의 4가지 기술들
- CSS framework : 이미 누가 만들어 놓은 레이아웃을 가져다 쓴다
- CSS float property : float 속성을 이용해 레이아웃을 만든다
- CSS flexbox : flexbox를 이용해 레이아웃을 만든다
- CSS grid : 페이지를 여러 열로 나누어서 레이아웃을 만든다
HTML Style Guide
HTML Versus XHTML
- XHTML는 EXtensible HyperText Markup Language의 약자이다
- XHTML은 HTML보다 더 엄격한 문법을 가진 XML 기반의 HTML이다
- XHTML 주로 사용하는 모든 브라우저에서 동작한다
- XHTML 이 등장한 배경은 HTML이 다른 데이터 포멧들(XML)과 더 유연하게 호환될 수 있도록 하기 위해서였다. 더 나아가 HTML의 경우 오류가 있어도 브라우저가 내용을 띄우지만 XHTML의 경우 문법이 더 엄격하기 때문에 오류를 잡아 줄 수 있는 장점이 있었다.
XHTML의 주요 특징들
- !DOCTYPE 가 필수이다
- xmlns 속성이 필수이다
- html, head, title, body가 필수이다
- 요소들이 순서대로 nested 되어야 한다
- 요소들을 항상 닫아줘야 한다
Leave a comment