
CSS 정리
Updated:
CSS란 무엇인가
위키백과의 정의에 의하면 CSS는 Cascading Style Sheets의 약자로 마크업 언어가 실제 표시되는 방법을 기술하는 언어이다. HTML과 XHTML에 주로 쓰이며 XML에서도 사용할 수 있다. W3C의 표준이며, 레이아웃과 스타일을 정의할 때의 자유도가 높다. 마크업 언어가 웹사이트의 몸체를 담당한다면 CSS는 옷과 액세서리 같은 꾸미는 역할을 담당한다고 할 수 있다. 즉, HTML 구조는 그대로 두고 CSS 파일만 변경해도 전혀 다른 웹사이트처럼 꾸밀 수 있다. 현재 개발 중인 CSS3의 경우 그림자 효과, 그라데이션, 변형 등 그래픽 편집 프로그램으로 제작한 이미지를 대체할 수 있는 기능이 추가되었다. 또한 다양한 애니메이션 기능이 추가되어 어도비 플래시를 어느 정도 대체하고 있다.
Css 예시
CSS의 기본 문법
1. CSS의 기본 문법
<!DOCTYPE html>
<html>
<head>
<style>
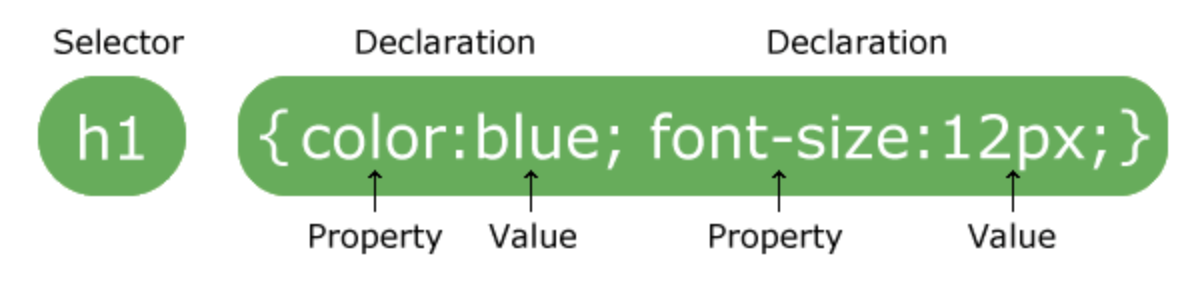
p {
color: red;
text-align: center;
}
/* p는 스타일을 지정하기 위해 선택된 요소이다 */
/* Map과 같은 방식으로 color와 text-align이라는 속성에 각각 red와 center라는 값이 지정되었다. 속성과 값은 ":"로 매칭되고 한가지 속성이 정의가 될 때마다 ";"로 마무리한다 */
</style>
</head>
<body>
<p>Hello World!</p>
<p>These paragraphs are styled with CSS.</p>
</body>
</html>
결과

2. CSS의 기본 구조
<!DOCTYPE html>
<html>
<head>
<style>
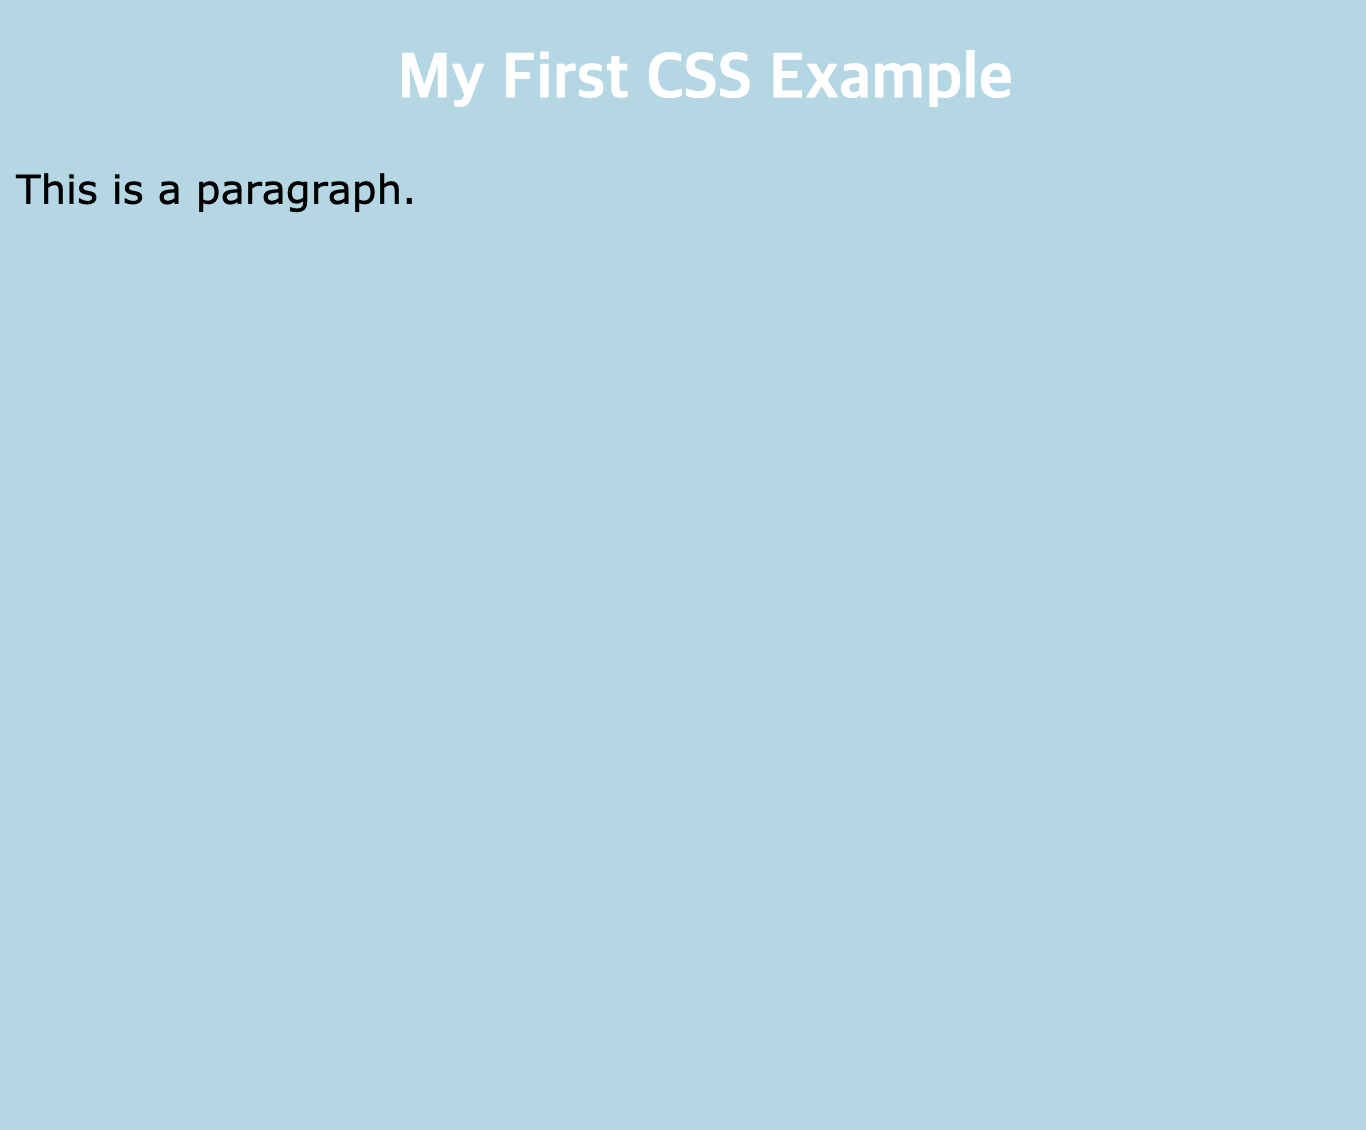
body {
background-color: lightblue;
} /* body 태그의 속성(위 경우 배경색)을 설정 */
h1 {
color: white;
text-align: center;
} /* h1 태그의 속성을 설정 */
p {
font-family: verdana;
font-size: 20px;
} /* p1 태그의 속성을 설정 */
</style> /* 보통 head 태그 안의 style 태그 안에서 스타일을 지정한다 */
</head>
<body>
<h1>My First CSS Example</h1>
<p>This is a paragraph.</p>
</body>
</html>
결과
3. CSS의 id Selector
/* CSS에는 여러가지 종류의 Selector가 존재한다 */
/* 위의 예시처럼 단순히 HTML tag로 선택하는 Selector는 기본형 Selector이다 */

<!DOCTYPE html>
<html>
<head>
<style>
#para1 {
  text-align: center;
  color: red;
}

/* id Selector는 HTML의 특정 요소의 id 속성을 통해 선택한다 */
/* 이때 CSS는 id로 선택한다는 뜻으로 #를 사용한다 */

</style>
</head>
<body>

<p id="para1">Hello World!</p>
<p>This paragraph is not affected by the style.</p>

</body>
</html>
결과

4. CSS의 Class Selector 1
<!DOCTYPE html>
<html>
<head>
<style>
.center {
  text-align: center;
  color: red;
}

/* Class Selector는 HTML의 요소들 중에 특정 Class 속성을 가진 요소들을 선택한다 */
/* 이때 CSS는 Class로 선택한다는 뜻으로 .를 사용한다 */
/* 만약 위에 .center 대신에 p.center를 입력하면 p 태그 중에 'center' class에 해당되는 태그들만 선택할 수 있다 */

</style>
</head>
<body>

<h1 class="center">Red and center-aligned heading</h1>
<p class="center">Red and center-aligned paragraph.</p>

</body>
</html>
결과

5. CSS의 Class Selector 2
<!DOCTYPE html>
<html>
<head>
<style>
p.center {
text-align: center;
color: red;
}
p.large {
font-size: 300%;
}
/* 아래에 'center' Class와 'large' Class에 동시에 해당되는 태그가 있는데 해당 태그는 위의 두가지 selector에 모두 해당이 되어 모든 값(text-align, color, font-size)이 적용된다 */
</style>
</head>
<body>
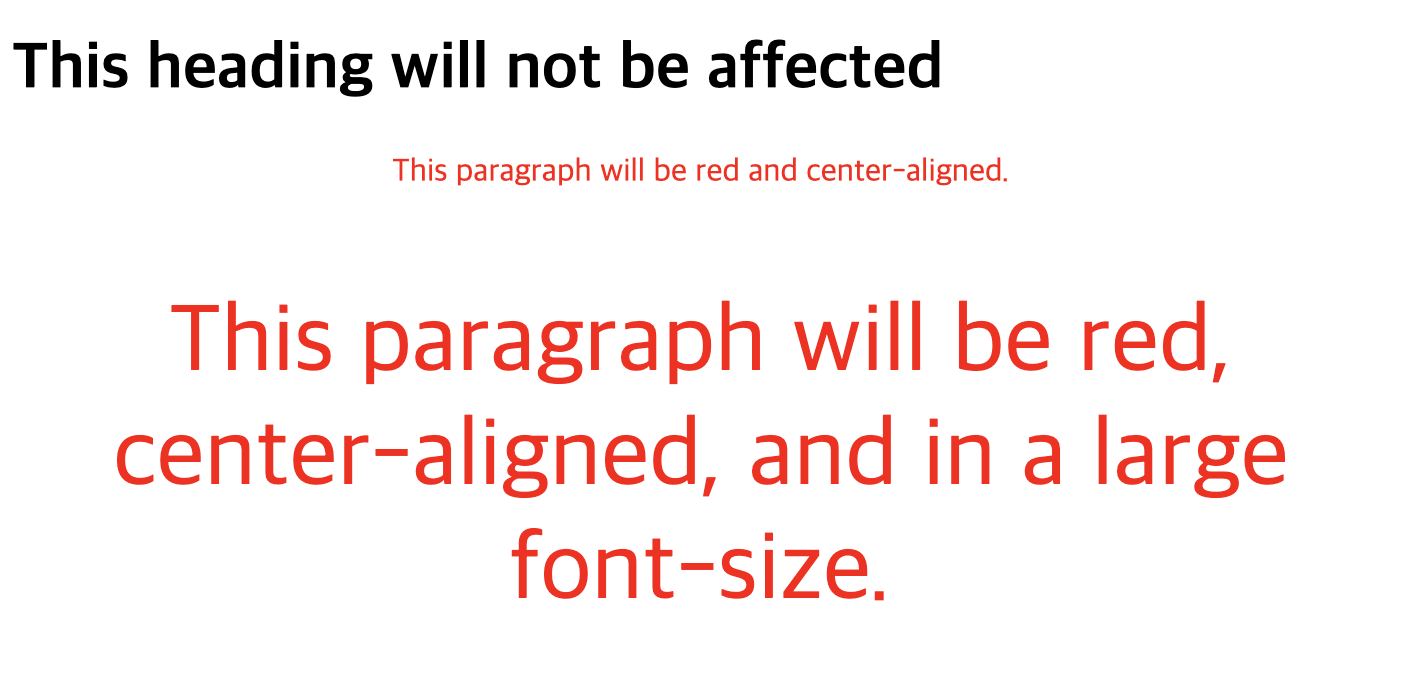
<h1 class="center">This heading will not be affected</h1>
<p class="center">This paragraph will be red and center-aligned.</p>
<p class="center large">This paragraph will be red, center-aligned, and in a large font-size.</p> /* HTML tag에서는 한가지 이상의 Class를 지정할 수 있다 */
</body>
</html>
결과
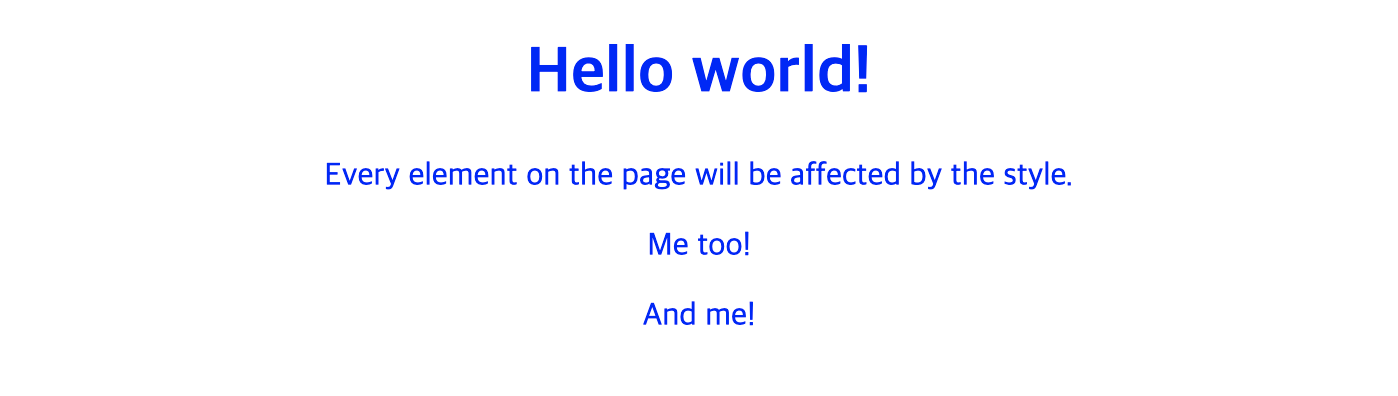
6. CSS의 Universal Selector
<!DOCTYPE html>
<html>
<head>
<style>
* {
  text-align: center;
  color: blue;
}
/* 위의 방식으로 '*'를 쓰면 페이지 내의 모든 HTML 요소에 영향을 주게 된다 */

</style>
</head>
<body>

<h1>Hello world!</h1>

<p>Every element on the page will be affected by the style.</p>
<p id="para1">Me too!</p>
<p>And me!</p>

</body>
</html>
결과
7. CSS의 Grouping Selector
h1 {
  text-align: center;
  color: red;
}

h2 {
  text-align: center;
  color: red;
}

p {
  text-align: center;
  color: red;
}
/* 이런식으로 여러 태그가 동일한 속성을 갖게 될 경우에 Grouping이 가능하다(아래 코드 참고) */
<!DOCTYPE html>
<html>
<head>
<style>
h1, h2, p {
  text-align: center;
  color: red;
}
</style>
</head>
<body>

<h1>Hello World!</h1>
<h2>Smaller heading!</h2>
<p>This is a paragraph.</p>

</body>
</html>
결과

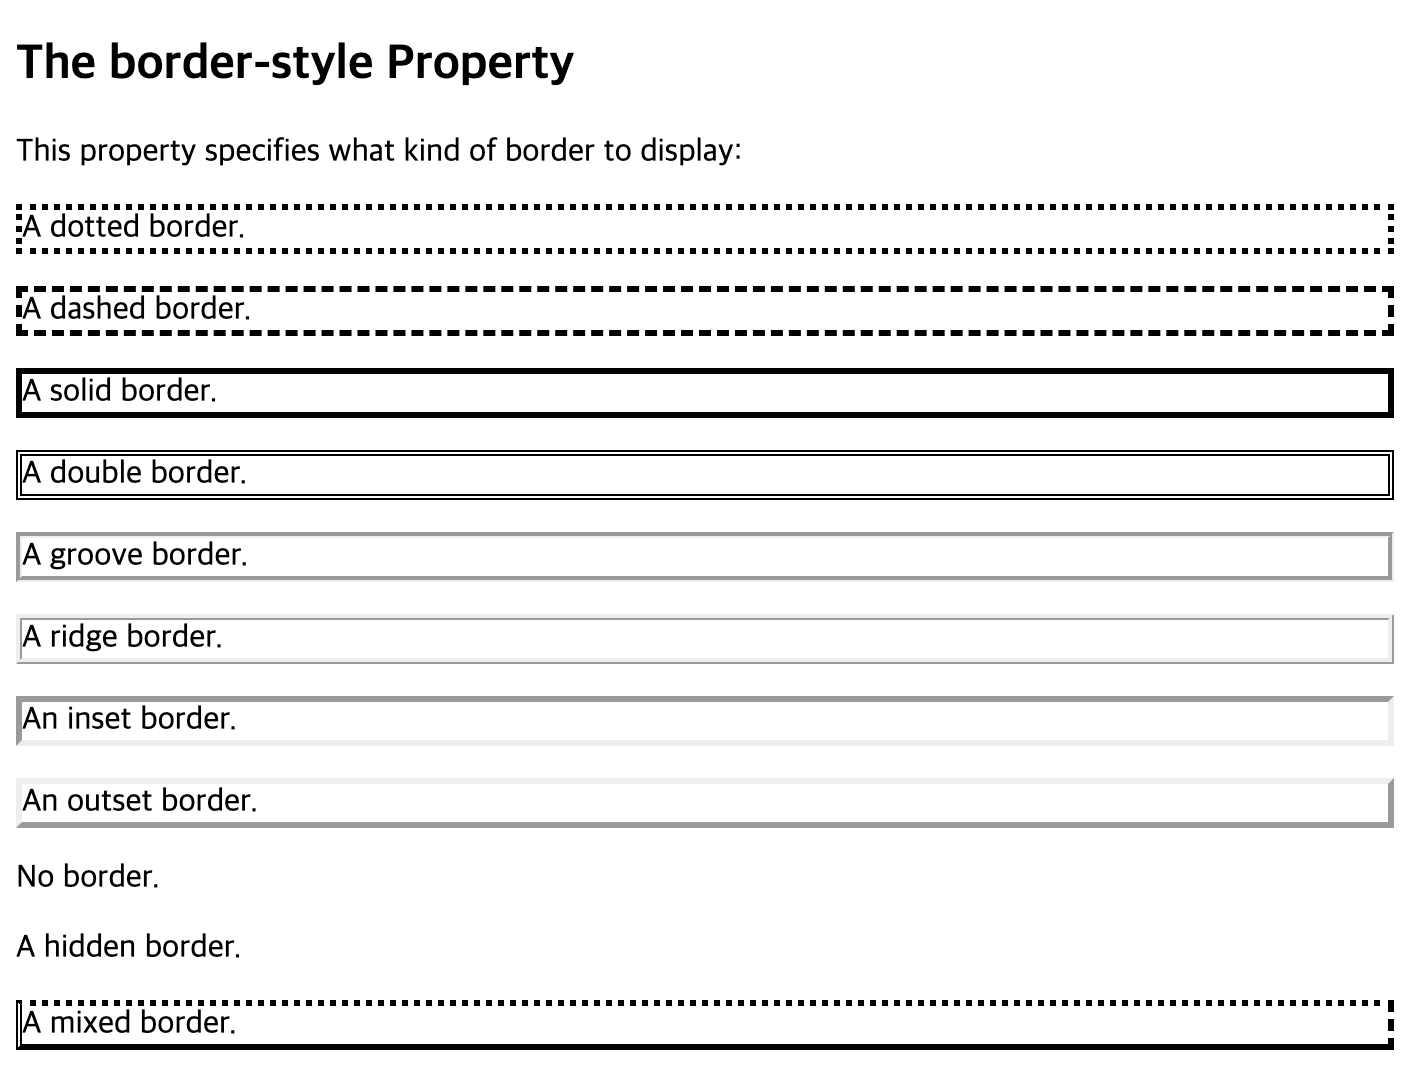
8. CSS의 Border
<!DOCTYPE html>
<html>
<head>
<style>
p.dotted {border-style: dotted;}
p.dashed {border-style: dashed;}
p.solid {border-style: solid;}
p.double {border-style: double;}
p.groove {border-style: groove;}
p.ridge {border-style: ridge;}
p.inset {border-style: inset;}
p.outset {border-style: outset;}
p.none {border-style: none;}
p.hidden {border-style: hidden;}
p.mix {border-style: dotted dashed solid double;}

/* CSS는 여러 모양의 border의 종류를 'border-style' 속성으로 지정할 수 있다 */
/* border는 그 외에 'border-width', 'border-color', 'border-radius' 등의 속성이 있다 */
/* 'border'라는 속성을 바로 쓸 수도 있는데 그럴 경우
-border-width
-border-style (필수)
-border-color
이 세가지를 한번에 지정할 수 있다.
예를 들어
p {
  border: 5px solid red;
}
이런 코드의 경우 border-width는 '5px', border-style은 'solid', border-color는 'red'로 한번에 지정하게 된다 */

</style>
</head>
<body>

<h2>The border-style Property</h2>
<p>This property specifies what kind of border to display:</p>

<p class="dotted">A dotted border.</p>
<p class="dashed">A dashed border.</p>
<p class="solid">A solid border.</p>
<p class="double">A double border.</p>
<p class="groove">A groove border.</p>
<p class="ridge">A ridge border.</p>
<p class="inset">An inset border.</p>
<p class="outset">An outset border.</p>
<p class="none">No border.</p>
<p class="hidden">A hidden border.</p>
<p class="mix">A mixed border.</p>

</body>
</html>
결과
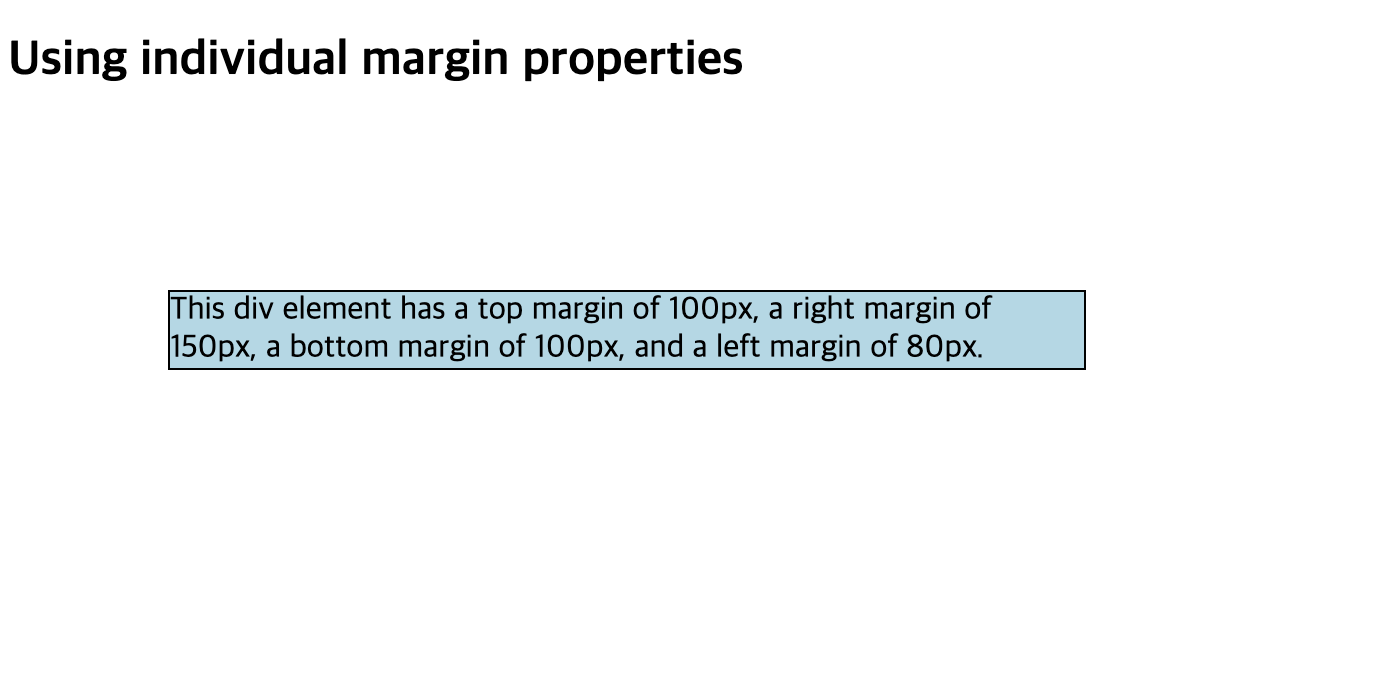
9. CSS의 Margin
<!DOCTYPE html>
<html>
<head>
<style>
div {
  border: 1px solid black;
  margin-top: 100px;
  margin-bottom: 100px;
  margin-right: 150px;
  margin-left: 80px;
  background-color: lightblue;
}
/* CSS의 margin은 해당 요소의 border 밖의 공간을 지정할 때 쓰인다 */
/* 위의 코드의 경우 위쪽과 아래쪽 margin은 100px, 오른쪽 margin은 150px, 왼쪽 margin은 180px이다 */
/* 위의 코드의 경우 'margin'이라는 속성으로 동일한 결과를 만들 수 있는데 그럴 경우
p {
  margin: 100px 150px 100px 80px; (순서대로 top, right, bottom, left)
}
이런식으로 쓸 수 있다
만약에 margin 속성에 값이 3개가 들어있으면 각각 top, right/left, bottom 으로 적용되고
margin 속성에 값이 2개가 들어있으면 각각 top/bottom, right/left 으로 적용되고
margin 속성에 값이 1개가 들어있으면 해당 값이 모든 방향으로 적용된다
만약에 margin에 'auto' 값이 들어오게 되면 좌우의 한 중간으로 오게 된다
만약에 margin에 'inherit' 값이 들어오게 되면 부모 요소의 값을 물려받게 된다
*/

</style>
</head>
<body>

<h2>Using individual margin properties</h2>

<div>This div element has a top margin of 100px, a right margin of 150px, a bottom margin of 100px, and a left margin of 80px.</div>

</body>
</html>
결과
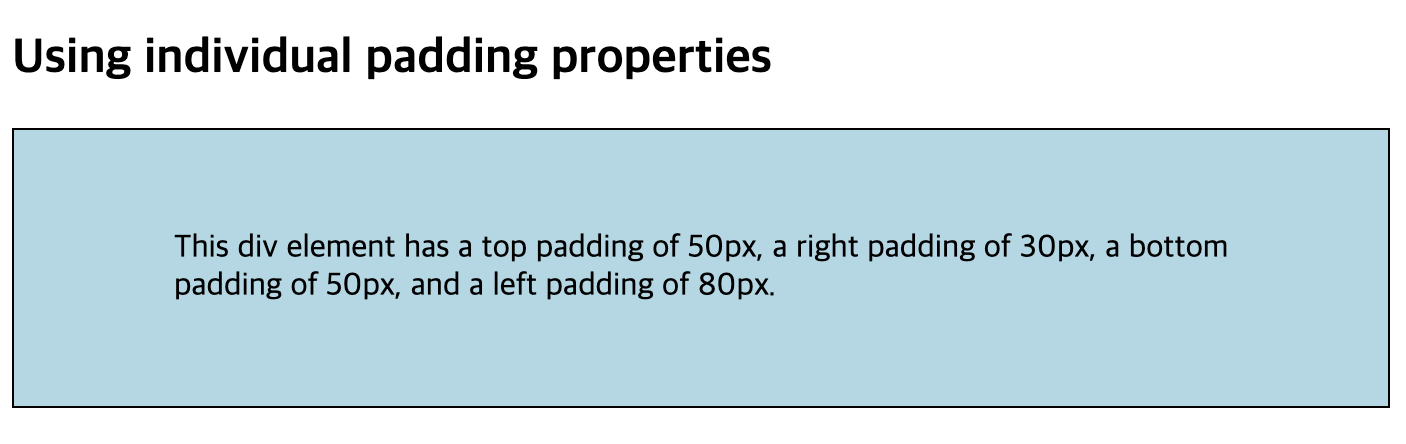
10. CSS의 Padding
<!DOCTYPE html>
<html>
<head>
<style>
div {
  border: 1px solid black;
  background-color: lightblue;
  padding-top: 50px;
  padding-right: 30px;
  padding-bottom: 50px;
  padding-left: 80px;
}
/* padding은 기본적으로 margin과 작동원리가 동일하다. 다만 margin은 border 밖의 영역을 지정하는거라면 padding은 border 안의 영역을 지정한다.
위의 코드의 경우 'padding'이라는 속성으로 동일한 결과를 만들 수 있는데 그럴 경우
div {
  padding: 25px 50px 75px 100px; (순서대로 top, right, bottom, left)
}
이런식으로 쓸 수 있다
만약에 padding 속성에 값이 3개가 들어있으면 각각 top, right/left, bottom 으로 적용되고
padding 속성에 값이 2개가 들어있으면 각각 top/bottom, right/left 으로 적용되고
padding 속성에 값이 1개가 들어있으면 해당 값이 모든 방향으로 적용된다
만약에 padding 'inherit' 값이 들어오게 되면 부모 요소의 값을 물려받게 된다
만약에
  width: 300px;
  padding: 70px;
  box-sizing: border-box;
이런식으로 width가 지정되 있고 'box-sizing: border-box' 가 되어 있으면 padding의 값에 상관없이 해당 요소는 300px의 크기를 유지하게 된다.
*/

</style>
</head>
<body>

<h2>Using individual padding properties</h2>

<div>This div element has a top padding of 50px, a right padding of 30px, a bottom padding of 50px, and a left padding of 80px.</div>

</body>
</html>
결과
Leave a comment